Hi guys, I've great news !
The germany book from Alois Schmid was translated to inglish and its available in the site http://www.ecospace.de/en_ecobook.html
I hope you guys liked ;)
I've already take a look on it and it look very good.
Regards,
Diego.
segunda-feira, 22 de maio de 2006
Novo Livro sobre ECO disponivel em ingles.
Boas noticias pessoa,
O livro em alemão do Alois Schmid foi traduzido para ingles e esta diponivel no site http://www.ecospace.de/en_ecobook.html
Espero que todos gostem.
Já dei uma lida por cima e o material é muito bom.
Abraços,
Diego.
O livro em alemão do Alois Schmid foi traduzido para ingles e esta diponivel no site http://www.ecospace.de/en_ecobook.html
Espero que todos gostem.
Já dei uma lida por cima e o material é muito bom.
Abraços,
Diego.
sexta-feira, 12 de maio de 2006
Demo Project, Using ECO (Maded to ClubeDelphi concurse)
Hi guys,
Well I dont have much time this days to put anything here in the blog, or even to finish the complete article of this demo or the ECO book translation, so I decided to post the complete project before I realease all the explanation about it. I was doing this tutorial for an concurse of the ClubeDelphi Magazine but I was busy and couldnt finished . . . yet.
I will finished but dont have any extimated time to do it becuse first I need to finish the ECO Book translation first and work work work .... then I will finish it :/
Here is the complete project code to study.
Clube Delphi Project
Any doubts or sugestions post an comment here or mail me, I will be glad on answear :)
Regards,
Diego
quinta-feira, 11 de maio de 2006
Projeto Exemplo de Utilização do ECO (Feito para Concurso da ClubeDelphi)
Fala pessoal,
Bom como não tive tempo de postar mais nada aqui no blog, nem de terminar o tutorial e o mini livro sobre ECO, resolvi então postar aqui o projeto completo do tutorial que eu estava fazendo para o concurso da revista Clube Delphi, porem mais uma vez o tempo acabou me prejudicando rs. ;) Terminei todo o exemplo em um dia mas o tutorial em si, pude fazer apenas as 12 primeiras páginas :(. Espero ainda ter um tempinho para termina-lo, após o mini livro é claro.
Aqui esta o projeto em um arquivo zip completo para estudo.
Projeto Clube Delphi
Qualquer duvidas, poste um comentario aqui que com certeza irei lhe ajudar ;)
Abraço a todos,
Diego.
quinta-feira, 27 de abril de 2006
Changing Language on Windows Causes Problems
Last week I've presence an litle problem that really bothers me.
In fact the problem was, if you open, modifie and compile some project on an english windows and after that open it on an portuguese windows you will get a lote of errors when try to execute the project pressing F9.
To fix just, delete all '.dcuil' files and '.resource' files and build your project.
Explanation: the dcuil files are the delphi compiled units thats points to the OS files in english like that 'C:\Program File\****' and in portuguese it should get from 'C:\Arquivos de Programas\****'.
Regards,
Diego.
Mudança de Linguagens do Windows Causa Problemas!
Semana passada passei por um problema besta mas que realmente chega a encomodar.
O fato é que se você abrir,modificar e compilar um projeto em um windows em ingles e depois abrir em um windows português você encontrará varios problemas no projeto ao executar com o F9.
Para corrigir é muito simples, delete todas os arquivos '.dcuil' e os arquivos '.resource' e de um build.
Explicação: os arquivos dcuil são as units compiladas que por sua vez estavam apontando para os arquivos do sistema operacional em ingles (ex.: C:\Program Files\ ****) sendo que em portugues deveria pegar de 'C:\Arquivos de Programas\****'.
Abraço,
Diego.
terça-feira, 18 de abril de 2006
Update 2 Delphi 2006 Ready to Download ;)
Hello guys,
Today Borland released the Update 2 for the Delphi Community.
Here is the link of fixes of this update,
http://qc.borland.com/qc/wc/qcmain.aspx?search=1&rib=10.0.22 and here is the link to download the update http://www.borland.com/downloads/registered/download_delphi.html
I've already installed :D
Regards,
Diego.
Update 2 Delphi 2006 Disponivel ;)
Fala galera,
Hoje a Borland disponibilizou o Update 2 para comunidade delphi.
Aqui esta o link das correções feitas neste update, http://qc.borland.com/qc/wc/qcmain.aspx?search=1&rib=10.0.22 e aqui está o link para download do update http://www.borland.com/downloads/registered/download_delphi.html
Já estou com o meu :D
Abração a todos,
Diego.
sábado, 15 de abril de 2006
One Unit per Class
Hello guys,
If you have a big project that should have many classes I recommend that you use the option to save one Class per unit. This option improve the IDE load time when working with many classes. The default option ECO saves all classes in one single file and that makes the IDE load time to be slowed Down.
To enable this option go to the menu Tools->Options and select the item ECO General Options, after that tick the One File Per Class and write the name that eco should save the units, the parameter {0} is the class name. In our case the example files would be saved with the name u + ClassName + Class being that way uClassNameClass.pas.

Regards,
Diego.
Uma Unit por Classe!
I ai pessoal tudo bem ?
Bom como estou meio sem tempo resolvi postar algumas dicas rapidas.
Se você tem um projeto grande para fazer utilizando o eco recomendo que você utilize o recurso de salvar uma Classe por Unit. Isse recurso faz com que o desempenho da IDE não diminua. Pois por padrão o ECO cria todas as classes em um unico arquivo o que ao aumentar a quantidade de classes faz com que fique mais lento para processar essas classes na IDE.
Para habilitar esta opção vá no menu Tools->Options e selecione o item ECO General Options depois marque a opção One File Per Class e escreva o nome que o eco deverá salvar as units sendo que o parametro {0} é o nome da classe. No caso do nosso exempo os arquivos serao salvos com o seguinte nome u + NomeDaClasse + Class ficando uNomeDaClasseClass.pas.
Abraços,
Diego.
quinta-feira, 13 de abril de 2006
Translation Almost Finished. 75% done.
Hello guys !
Sorry for not post anymore articles last days :/
I have a lote of projects this days and I couldnt post more articles.
However I've found sometime to continue the tranlation! Its very good until now, it already miss some pages but the important is that 75% is almost finished I just have to make another revision.
Sun it will be available!
Guys I promiss that I will post a lote of new things as sun as possible :D
And beleave me it has wonderfull things :)
Keep eye on !
Regards,
Diego.
Tradução quase pronta ! 75% Terminada.
I ai galera tudo bem ?
Bom em primeiro lugar desculpem me por não ter postado mais nada estes ultimos dias :/
Estou correndo com os projetos e acabei ficando sem tempo de postar mais artigos.
Mas embora estivesse ocupado de mais no serviço ainda achei tempo para continuar com a tradução ! Está ficando muito legal, ainda faltam algumas paginas mas o importante é que 75% está praticamente terminado.
Em breve estará tudo aqui disponivel para vocês !
Me desculpem irei compensar vocês por isso em breve com muitas coisas novas :D
Fique de olho !
Abraços,
Diego.
quarta-feira, 22 de março de 2006
Good News (Mini ECO Book PT BR)
Hi guys !
This week I was a litle busy here with the service,
so many news are comming, one of then is that Peter Morris allowed me to translate the Mini Eco Book about Eco Services !
Probably until the end of the next week it will be ready !
Another news is that I've missed the day to send my Article to concur an Delphi 2006 from clube delphi magazine, so I will be finishing the text of my article and posting it here, probably it will have 3 parts! In that article I explain how to use expression handles, currency managers, comboboxes, Eco State Machines, some OCL tips and another things.
Keep eye on it ;)
Ps.: Maybe I delay a litle bit becuse I've finished some projects this days but I will try my best to post it all until the end of next week.
Regards,
Diego.
Boas Noticias (Mini Book ECO PT BR)
Oi pessoal tudo bem ?
Bom essa semana andei meio ocupado aqui com o serviço,
muitas novidades estão por vir, uma delas é que o Peter Morris me autorizou a fazer a tradução do Mini livro dele sobre ECO Services ! Então aguardem !
Provavelmente até o fim da semana que vem estará pronto.
Outra novidade é que perdi o dia da entrega da materia que concorria a um Delphi 2006 da clube delphi então estarei terminando o texto da matéria e publicarei aqui provavelmente em umas 3 partes! Nesta materia explico como utilizar, expression handles, currency managers, combobox, State Machine, algumas dicas de OCL entre outros.
Fique de olho ;)
Ps.: Pode ser que eu atraze um pouco devido ao número de projetos que tenho estes dias mas tentarei fazer o maximo possivel para que semana que vem esteja tudo ai.
Abração,
Diego.
quarta-feira, 15 de março de 2006
New Eco website.
Hello guys !
Peter Morris has opened an new eco website, and the good news is that it already has an mini book (we can say) about Eco Services and between us its amazing. I recomend the reading ;)
http://myecospace.net
Regards,
Diego.
Peter Morris has opened an new eco website, and the good news is that it already has an mini book (we can say) about Eco Services and between us its amazing. I recomend the reading ;)
http://myecospace.net
Regards,
Diego.
Novo site sobre Eco.
I ai galera tudo bem ?
Peter Morris lançou seu novo site sobre eco que por sinal já tem um mini livro pode se dizer, sobre Eco Services muito bom por sinal. Vale a pena conferir.
http://myecospace.net
Abração a todos,
Diego.
Peter Morris lançou seu novo site sobre eco que por sinal já tem um mini livro pode se dizer, sobre Eco Services muito bom por sinal. Vale a pena conferir.
http://myecospace.net
Abração a todos,
Diego.
terça-feira, 14 de março de 2006
Required Files to deploy an ECO Application (WindowsForms)
Hello guys how have you been ?
I was a litle busy this days solving some problems at the company but everthing is nice now ;)
I will write above an list of required files to deplou an ECO Windows Forms application that uses the Interbase, and I will write with the list some explanation of other DB's.
bdpInt20.dll -> required interbase dll, if you uses another DB take a look for the one that matches your DB in the folder 'C:\Program Files\Borland\BDS\3.0\Bin', here comes an example of some of the dll's: (bdpmss20.dll: MicrosoftSql, bdpora20.dll:Oracle, bdpsyb20.dll: Sybase, and others). To understand the name of the dll is simple, bdp means borland data provider + the short name of the db + bdp version.
Borland.Data.Interbase.dll -> required interbase dll, if you uses another DB take a look for the one that matches your DB in the folder 'C:\Program Files\Common Files\Borland Shared\BDS\Shared Assemblies\3.0' if you are using ECO II or in the folder 'C:\Program Files\Common Files\Borland Shared\BDS\Shared Assemblies\4.0' if you are using ECO III.
Borland.Data.Common.dll
Borland.Data.Provider.dll
Borland.Delphi.dll
Borland.Eco.Core.dll
Borland.Eco.Handles.dll
Borland.Eco.Interfaces.dll
Borland.Eco.Ocl.ParserCore.dll
Borland.Eco.Persistence.dll
Borland.Eco.Windows.Forms.dll
EcoPatches.dll -> Only necessary if you are using ECO II with the ECO Patches.
Attention: it can be some other dlls, it depends the components you are using in your project.
To know what dll your project needs to be deployed has to ways, one is to look at the assembler list of your delphi (references) but sometimes it doesnt have all of the assemblers. The other way is to put it your program in other pc that doesnt have the delphi installed and that have an .net debugger installed, so you can run with the .net debbuger and look at the referenced assemblers called from your program.
In another post I will explain step-by-step how to install an .net debbuger and how to find the required assemblers to be deployed.
I hope you guys have liked ;)
Regards,
Diego.
Arquivos necessarios para fazer deploy de uma aplicação ECO (Windowsforms)
I ai galera tudo bem ?
Andei meio ocupado esses dias resolvendo alguns pepinos aqui na empresa mas tudo tranquilo.
Vou colocar abaixo a lista de arquivos necessarios para fazer deploy de uma aplicação ECO windows forms que utiliza o Interbase e junto a lista de arquivos irei dar uma breve explicação sobre os outros BD's.
bdpInt20.dll -> dll necessaria para o interbase funcionar, caso utilize outro BD, procure a dll equivalente na pasta 'C:\Arquivos de programas\Borland\BDS\3.0\Bin', aqui vai um exemplo de algumas dll's: (bdpmss20.dll: MicrosoftSql, bdpora20.dll:Oracle, bdpsyb20.dll: Sybase, e outros). Para entender o nome da dll é simples bdp de borland data provider + nome do bd abreviado + versão do bdp.
Borland.Data.Interbase.dll -> dll necessaria para o interbase funcionar, caso utilize outro bd procure a dll equivalente na pasta 'C:\Arquivos de programas\Arquivos comuns\Borland Shared\BDS\Shared Assemblies\3.0' se for ECO II ou na pasta 'C:\Arquivos de programas\Arquivos comuns\Borland Shared\BDS\Shared Assemblies\4.0' se for ECO III.
Borland.Data.Common.dll
Borland.Data.Provider.dll
Borland.Delphi.dll
Borland.Eco.Core.dll
Borland.Eco.Handles.dll
Borland.Eco.Interfaces.dll
Borland.Eco.Ocl.ParserCore.dll
Borland.Eco.Persistence.dll
Borland.Eco.Windows.Forms.dll
EcoPatches.dll -> É necessario apenas se você estiver utilizando ECO II com o eco patches.
Atenção poderá existir mais dlls de acordo com os componentes que você utilize em sua aplicação.
Para saber quais dlls são necessarias existem duas maneiras, uma é olhar na lista de assemblers do seu delphi (references) porém as vezes alguns dos assemblers não são exibidos na lista e quando você for fazer seu deploy você tera erros ao executar o programa. A outra forma é de você colocar em um outro computador que não tenha o delphi instalado e que tenha um depurador .net para você acompanhar os processos que seu programa ira executar ao inicia-lo e ver o nome dos respectivos assemblers.
Em um proximo artigo explicarei passo a passo como instalar um depurador .net e acompanhar os passos de um programa a ser feito deploy.
Espero que vocês tenhão gostado ;)
Abraços,
Diego.
segunda-feira, 13 de março de 2006
Creating ECO Reports with 9Rays Report
Well, this time I will show how easy is to make reports using ECO.
Create a new ECO Winform Project, for this, go to File->New->Other select the Delphi Net Projects folder, do a double click in ECO Winforms Application.
Now, go to the tab Model View and expand the first item of the list clicking in the signal ‘+’, expand the Package1 item and perform a double click in the first item of the list.
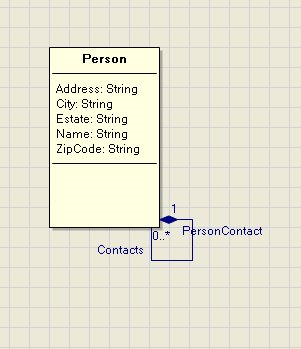
Now create a model like below:

don’t forget to change the name of the two type ends in the association or the ECO will complain.
Now click in the first tab at the left of the Model View and a double click in the Winform.pas item.
configure the property ECOSpaceType of the component rhRoots to use its Model.
Delete the components EcoAutoFormExtender, ECOListActionExtender and ECOGlobalActions.
Add and component ReportGenerator component and set its OwnerForm property to the current form and change its name for rptECOReport.
* Add in the DataSources property, clicking in the button Add, the name PessoaList and the Value pointing to ehPerson. (this item in design time wouldn’t have to be important, however if you do not fill it you will find problems when trying to have access to the DataSource property when trying to access it by code, therefore it is recommended to fill it).
Add two components ExpressionHandle and a CurrencyManager.
Change the name of one of the ExpressionHandle to ehPerson and the other to ehContact and change the name of the CurrencyManager to cmhPerson.
ehPerson must have the following expression Person.allInstances->select(e expression|e.PersonContact->isEmpty), then set its property *AddDefaultNestings to true and change the property RootHandle to use rhRoot, the ehContact must have its expression self.Contacts and its RootHandle will have to point to cmhPerson.
cmhPerson must have its RootHandle property pointing to ehPerson and its BindingContext property pointing to the TWinForm.
* We change to true the AddDefaulNesting property so that our report understands that our object Contact is a Person and it has the same fields that a Person and allows we to use it, set to false the report would only show the object without attributes, not allowing that the same to be manipulated.
Now, add to two datagrids and three buttons.
Change the DataSource option of one DataGrid to use ehPerson and the other to use the ehContact.
Changes the Text property of one of the buttons to Create Person, with the following code in the Click event:
Person.Create(EcoSpace);
Changes the Text property of the other button to Create Contact, with the following code in the Click event:
var
vContact: Person;
begin
if Assigned(cmhPerson.Element) then
begin
vContact: = Person.Create(EcoSpace);
(cmhPerson.Element.AsObject Person).Contacts.Add(vContact);
end
else
MessageBox.Show(‘ No person to add contacts ');
end;
Add the following namespaces in the section use of your code: NineRays.Reporting.DOM, System.Resources,
NineRays.Reporting.View.
Change the Text property of the other button to Generate Report, with the following code in the Click event:
var
vPreviewForm: PreviewForm;
begin
ehPessoa.EnsureBindingList; //Update the list off Persons so our report keeps updated
ehContato.EnsureBindingList;// Update the list off Contacts so our report keeps updated
rptECOReport.DataSources.Clear; //clean the report DataSources list.
rptECOReport.DataSources.Add('PessoaList', ehPessoa.GetList);//Add our list updated to the DataSource
rptECOReport.DesignTemplate; //This method is used only to draw the report. After Drawn it won’t be used.
rptECOReport.LoadTemplate(Application.ExecutablePath.Trim('EcoReport.exe'.ToCharArray)+'\EcoReport.rst '); //Load the saved report designed by the DesignTemplate method. Attention the name of the report must be the same of the one saved in the DesignTemplate.
vPreviewForm: = PreviewForm.Create(rptECOReport);// we create the form to show the Preview of the Report.
try
try
rptECOReport.Prepare; //Prepare the report.
vPreviewForm.WindowState: = FormWindowState.Maximized; //Set the state of the window to Maximized.
vPreviewForm.ShowDialog; //Show the Preview Form.
except
on ee: Exception of the MessageBox.Show(ee.Message, 'ECO Report ', MessageBoxButtons.OK, MessageBoxIcon.Error); //If occur some error we show it to the user.
end;
finally
vPreviewForm.Dispose; //Free the memory resources.
end;
end;
Now execute the program and click in the button Generate Report and the screen of design will be shown, as below:

go to File menu - > New - > Blank Report and click in Ok.
With our new report opened add a PageHeader in our report, to do this click in the icon then click in the report and put the PageHeader at the top of the page. Go to the DataSources tab and go to the Item Special Fields, you will find fields to identify the page number the description of the document, total page and others, Click and drag the Page Number inside of the PageHeader and put it on the right side. (Attention: Always place the objects inside the one you want to show or the same will not be shown). You can place the title of your Report in the PageHeader if you want to print it in all report pages or you can place a Detail and write inside it, to appear only in the initial page. In our case we go to add a Detail, to do that click in the icon
  and put it below the pageHeader, after that put a Text inside the Detail using the first item of the left lateral bar, called TextBox, and change its Text property to ECO Report with 9Rays.
Lets start to manipulate the ECO objects.
Add a DataBand clicking in the icon and put it below of the Detail, click in the DataBand and change its DataSource property to PersonList (the Name given in the DataSource of rptEcoReport), attention: to manipulate the data to be shown all the components as Header, Detail and others will have to be placed inside of the main DataBand or the data won’t be shown.
Good, with our DataBand ready lets place a Header inside it, to do that click in the icon and draw it inside of the DataBand. After that, put a TextBox with the Text Name and other with the Text Address inside the Header.
After that, add an Detail inside the DataBand, go to the Data Sources and expand the PersonList item (Exactly name of rptEcoReport) click and drag the item Name inside of the Detail, make the same thing with the Address.
Well, now we go to add another DataBand inside of our Databand to show the Contacts of each Person, add the DataBand and setup its DataSource to point to PeersonList.Contacts.
After that, add a Header and a Detail inside of this DataBand as made in the first one, the only difference is that you will have to catch the fields that is inside the DataSource called PersonList - > Contacts and drag them as done previously.
You can add a pageFooter to if you want.
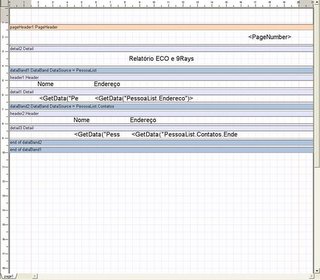
The final result must be as below:

Save the report with the name EcoReport in the same folder of the executable, now close the program and remove or comment the line:
rptRelatorioECO.DesignTemplate;
Save the Project and run, add some Persons and some Contacts and take a look at the final result ;).
To download 9Rays enter in the site of the company: 9Rays
I hope you liked, see you next week!
Any doubts or comments post it in the blog, after all the blog is setuped to accept comments without having a blog account.
Create a new ECO Winform Project, for this, go to File->New->Other select the Delphi Net Projects folder, do a double click in ECO Winforms Application.
Now, go to the tab Model View and expand the first item of the list clicking in the signal ‘+’, expand the Package1 item and perform a double click in the first item of the list.
Now create a model like below:
don’t forget to change the name of the two type ends in the association or the ECO will complain.
Now click in the first tab at the left of the Model View and a double click in the Winform.pas item.
configure the property ECOSpaceType of the component rhRoots to use its Model.
Delete the components EcoAutoFormExtender, ECOListActionExtender and ECOGlobalActions.
Add and component ReportGenerator component and set its OwnerForm property to the current form and change its name for rptECOReport.
* Add in the DataSources property, clicking in the button Add, the name PessoaList and the Value pointing to ehPerson. (this item in design time wouldn’t have to be important, however if you do not fill it you will find problems when trying to have access to the DataSource property when trying to access it by code, therefore it is recommended to fill it).
Add two components ExpressionHandle and a CurrencyManager.
Change the name of one of the ExpressionHandle to ehPerson and the other to ehContact and change the name of the CurrencyManager to cmhPerson.
ehPerson must have the following expression Person.allInstances->select(e expression|e.PersonContact->isEmpty), then set its property *AddDefaultNestings to true and change the property RootHandle to use rhRoot, the ehContact must have its expression self.Contacts and its RootHandle will have to point to cmhPerson.
cmhPerson must have its RootHandle property pointing to ehPerson and its BindingContext property pointing to the TWinForm.
* We change to true the AddDefaulNesting property so that our report understands that our object Contact is a Person and it has the same fields that a Person and allows we to use it, set to false the report would only show the object without attributes, not allowing that the same to be manipulated.
Now, add to two datagrids and three buttons.
Change the DataSource option of one DataGrid to use ehPerson and the other to use the ehContact.
Changes the Text property of one of the buttons to Create Person, with the following code in the Click event:
Person.Create(EcoSpace);
Changes the Text property of the other button to Create Contact, with the following code in the Click event:
var
vContact: Person;
begin
if Assigned(cmhPerson.Element) then
begin
vContact: = Person.Create(EcoSpace);
(cmhPerson.Element.AsObject Person).Contacts.Add(vContact);
end
else
MessageBox.Show(‘ No person to add contacts ');
end;
Add the following namespaces in the section use of your code: NineRays.Reporting.DOM, System.Resources,
NineRays.Reporting.View.
Change the Text property of the other button to Generate Report, with the following code in the Click event:
var
vPreviewForm: PreviewForm;
begin
ehPessoa.EnsureBindingList; //Update the list off Persons so our report keeps updated
ehContato.EnsureBindingList;// Update the list off Contacts so our report keeps updated
rptECOReport.DataSources.Clear; //clean the report DataSources list.
rptECOReport.DataSources.Add('PessoaList', ehPessoa.GetList);//Add our list updated to the DataSource
rptECOReport.DesignTemplate; //This method is used only to draw the report. After Drawn it won’t be used.
rptECOReport.LoadTemplate(Application.ExecutablePath.Trim('EcoReport.exe'.ToCharArray)+'\EcoReport.rst '); //Load the saved report designed by the DesignTemplate method. Attention the name of the report must be the same of the one saved in the DesignTemplate.
vPreviewForm: = PreviewForm.Create(rptECOReport);// we create the form to show the Preview of the Report.
try
try
rptECOReport.Prepare; //Prepare the report.
vPreviewForm.WindowState: = FormWindowState.Maximized; //Set the state of the window to Maximized.
vPreviewForm.ShowDialog; //Show the Preview Form.
except
on ee: Exception of the MessageBox.Show(ee.Message, 'ECO Report ', MessageBoxButtons.OK, MessageBoxIcon.Error); //If occur some error we show it to the user.
end;
finally
vPreviewForm.Dispose; //Free the memory resources.
end;
end;
Now execute the program and click in the button Generate Report and the screen of design will be shown, as below:

go to File menu - > New - > Blank Report and click in Ok.
With our new report opened add a PageHeader in our report, to do this click in the icon
 then click in the report and put the PageHeader at the top of the page. Go to the DataSources tab and go to the Item Special Fields, you will find fields to identify the page number the description of the document, total page and others, Click and drag the Page Number inside of the PageHeader and put it on the right side. (Attention: Always place the objects inside the one you want to show or the same will not be shown). You can place the title of your Report in the PageHeader if you want to print it in all report pages or you can place a Detail and write inside it, to appear only in the initial page. In our case we go to add a Detail, to do that click in the icon
  and put it below the pageHeader, after that put a Text inside the Detail using the first item of the left lateral bar, called TextBox, and change its Text property to ECO Report with 9Rays.
 Lets start to manipulate the ECO objects.
Add a DataBand clicking in the icon
 and put it below of the Detail, click in the DataBand and change its DataSource property to PersonList (the Name given in the DataSource of rptEcoReport), attention: to manipulate the data to be shown all the components as Header, Detail and others will have to be placed inside of the main DataBand or the data won’t be shown.
 Good, with our DataBand ready lets place a Header inside it, to do that click in the icon
 and draw it inside of the DataBand. After that, put a TextBox with the Text Name and other with the Text Address inside the Header.
 After that, add an Detail inside the DataBand, go to the Data Sources and expand the PersonList item (Exactly name of rptEcoReport) click and drag the item Name inside of the Detail, make the same thing with the Address.
Well, now we go to add another DataBand inside of our Databand to show the Contacts of each Person, add the DataBand and setup its DataSource to point to PeersonList.Contacts.
After that, add a Header and a Detail inside of this DataBand as made in the first one, the only difference is that you will have to catch the fields that is inside the DataSource called PersonList - > Contacts and drag them as done previously.
You can add a pageFooter to if you want.
The final result must be as below:

Save the report with the name EcoReport in the same folder of the executable, now close the program and remove or comment the line:
rptRelatorioECO.DesignTemplate;
Save the Project and run, add some Persons and some Contacts and take a look at the final result ;).
To download 9Rays enter in the site of the company: 9Rays
I hope you liked, see you next week!
Any doubts or comments post it in the blog, after all the blog is setuped to accept comments without having a blog account.
segunda-feira, 6 de março de 2006
Criando Relatórios no ECO com 9Rays Report
Bom desta vez irei mostrar como é fácil fazer relatórios utilizando ECO.
Crie um novo Projeto Eco Winforms, para isso vá em File->New->Other selecione a pasta Delphi for .Net Projects, de um duplo clique em ECO Winforms Application.
Vá agora na aba Model View expanda o primeiro item da lista clicando no sinal ‘+’, expanda o item Package1 e de um duplo clique no primeiro item.
Crie o modelo como abaixo:

Não se esqueça de mudar o nome das duas pontas da associação ou o ECO irá reclamar.
Agora clique na primeira aba do lado do esquerdo da Model View e de um duplo clique no item Winform.pas.
Configure a propriedade ECOSpaceType do componente rhRoot para usar seu Modelo.
Delete os componentes EcoAutoFormExtender, ECOListActionExtender e ECOGlobalActions.
Adicione o componente ReportGenerator e sete sua propriedade OwnerForm para o form atual e mude seu nome para rptRelatorioECO.
* Adicione na propriedade DataSources, clicando no botão Add, o Nome PessoaList e o Value apontando para o ehPessoa. (esse item em tempo de design não deveria ser importante, porém se você não preenche-la você poderá encontrar problemas ao tentar acessar a propriedade DataSource via código, por isso é recomendado preenche-la).
Adicione dois componentes ExpressionHandle e um CurrencyManager.
Mude o nome de um dos ExpressionHandle para ehPessoa e o outro para ehContato e mude o nome do CurrencyManager para cmhPessoa.
O ehPessoa deverá ter a seguinte expressão Pessoa.allInstances->select(e|e.PessoaContato->isEmpty), sete a propriedade *AddDefaultNestings para true e mude a propriedade rootHandle para usar o rhRoot, o ehContato deverá ter está expressão self.Contatos e seu rootHandle deverá apontar para cmhPessoa.
O cmhPessoa deverá ter sua propriedade RootHandle apontando para o ehPessoa e sua propriedade BindingContext apontando para o TWinForm.
*Mudamos para true a propriedade AddDefaulNesting para que nosso relatório entenda que o nosso objeto Contato é uma Pessoa e possui os mesmos campos que uma Pessoa e permita que nós o utilizemos, caso contrario o relatório iria apenas mostrar o objeto sem atributos, não permitindo que o mesmo seja manipulado.
Agora Adicione dois datagrids e três botões.
Mude a opção DataSource de um dos DataGrids para usar o ehPessoa e o outro para usar o ehContato.
Mude a propriedade Text de um dos botões para Criar Pessoa, com o seguinte código no evento Click:
Pessoa.Create(EcoSpace);
Mude a propriedade Text do outro botão para Criar Contato, com o seguinte código no evento Click:
var
vContato: Pessoa;
begin
if Assigned(cmhPessoa.Element) then
begin
vContato := Pessoa.Create(EcoSpace);
(cmhPessoa.Element.AsObject as Pessoa).Contatos.Add(vContato);
end
else
MessageBox.Show('Não Existe nenhuma pessoa para adicionar contatos!');
end;
Adicione os seguintes namespaces na seção uses do seu código: NineRays.Reporting.DOM, System.Resources,
NineRays.Reporting.View.
Mude a propriedade Text do outro botão para Gerar Relatório, com o seguinte código no evento Click:
var
vPreviewForm : PreviewForm;
begin
ehPessoa.EnsureBindingList; //Certificamos que a lista de Pessoas esta atualizada
ehContato.EnsureBindingList; //Certificamos que a lista de Contatos esta atualizada
rptRelatorioECO.DataSources.Clear; //Limpamos a lista de DataSources do Relatorio.
rptRelatorioECO.DataSources.Add('PessoaList',ehPessoa.GetList); //Adicionamos a nossa lista de pessoas atual ao datasource.
rptRelatorioECO.DesignTemplate; //Este método é utilizado apenas para desenharmos o relatorio. Após Desenhado não será mais utilizado.
rptRelatorioECO.LoadTemplate(Application.ExecutablePath.Trim('ExemploRelatoriEco.exe'.ToCharArray)+'\relatorioEco.rst'); //Carregamos o arquivo que iremos salvar após Desenhar o relatório e salvar. Atenção o nome do relatório deve ser o mesmo do que foi salvo no Design dele.
vPreviewForm := PreviewForm.Create(rptRelatorioECO); //Criamos o form de Preview do Relatório.
try
try
rptRelatorioECO.Prepare; //Preparamos o relatorio
vPreviewForm.WindowState := FormWindowState.Maximized; //Setamos o estado da janela para Maximizado.
vPreviewForm.ShowDialog; //Exibimos a tela de Preview.
except
on ee : Exception do MessageBox.Show(ee.Message, 'Relatorio no ECO', MessageBoxButtons.OK, MessageBoxIcon.Error); //Se ocorrer algum erro mostramos o mesmo para o usuário.
end;
finally
vPreviewForm.Dispose; //Liberamos o recurso da memória.
end;
end;
Agora Execute o programa e click no botão Gerar Relatório a tela de design será exibida, como abaixo:
Vá no menu File -> New -> Blank Report e click em Ok.
Com nosso novo relatório criado vamos adicionar um PageHeader (cabeçalho) no nosso relatório, para isso click no ícone depois click no relatório e posicione o pageheader no topo da pagina. Vá na aba DataSources e vá no Item Special Fields, você encontrará campos para identificar o numero da pagina a descrição do documento, total de paginas e outros, Click e arraste o Page Number para dentro do PageHeader e posicione o na lateral direita. (Atenção: Coloque sempre dentro ou o mesmo não será exibido). Você poderá colocar o titulo de seu Relatório dentro do PageHeader caso queira que ele seja exibido em todas as paginas ou colocar um Detail e escrever dentro para ele aparecer apenas na pagina inicial. No nosso caso vamos adicionar um detail, para isso click no ícone
e Posicione o abaixo de seu pageHeader, após fazer adicione um texto dentro do Detail utilizando o primeiro item da barra lateral esquerda, chamado TextBox, e altere sua propriedade Text para Relatório ECO e 9Rays.
Vamos agora começar a manipular os dados do ECO.
Para isso adicione um DataBand clicando no ícone e posicione-o abaixo do Detail, click no DataBand e altere sua propriedade DataSource para PessoaList (O Nome dado no DataSource do rptRelatorioEco), atenção para manipular os dados a serem exibidos todos os componentes como Header, Detail e outros deverão ser colocados dentro do DataBand principal ou os dados não serão exibidos.
Bom com nosso DataBand criado vamos agora colocar um Header dentro dele, para isso click no ícone e desenhe-o dentro do DataBand. (Repeti novamente para que não ocorra nenhum erro). Depois de feito isso adicione dois TextBox um com o Text Nome e o outro Endereço.
Depois de feito isso adicione dentro do DataBand um componente Detail, vá na aba Data Sources e expanda o item PessoaList (Mesmo nome do rptRelatorioEco) click e arraste o item Nome para dentro do Detail, faça a mesma coisa com o Endereço.
Bom agora vamos adicionar um outro DataBand dentro do nosso Databand para exibir os Contatos de cada Pessoa, adicione o DataBand e configure seu DataSource para apontar para PessoaList.Contatos.
Após ter feito isso adicione um Header e um Detail dentro deste DataBand como feito no primeiro porem você deverá pegar os campos da aba DataSource que esta dentro do PessoaList -> Contatos e arrastá-los como feito anteriormente.
Após ter feito isso você poderá adicionar um pageFooter para colocar um rodapé.
O resultado final devera ser como o abaixo:
Salve o relatório com o nome relatorioEco no mesmo diretório do executável e feche o editor de relatórios, feche o programa e remova ou comente a linha:
rptRelatorioECO.DesignTemplate;
Salve seu Projeto e execute o programa, adicione algumas Pessoas e alguns Contatos e veja o resultado final ;).
Para baixar o 9Rays entre no site da empresa: 9Rays
Abraços e espero que tenham gostado e até semana que vem.
Qualquer duvida ou comentários postem no blog afinal está liberada a postagem de comentários sem cadastro no blog.
Crie um novo Projeto Eco Winforms, para isso vá em File->New->Other selecione a pasta Delphi for .Net Projects, de um duplo clique em ECO Winforms Application.
Vá agora na aba Model View expanda o primeiro item da lista clicando no sinal ‘+’, expanda o item Package1 e de um duplo clique no primeiro item.
Crie o modelo como abaixo:

Não se esqueça de mudar o nome das duas pontas da associação ou o ECO irá reclamar.
Agora clique na primeira aba do lado do esquerdo da Model View e de um duplo clique no item Winform.pas.
Configure a propriedade ECOSpaceType do componente rhRoot para usar seu Modelo.
Delete os componentes EcoAutoFormExtender, ECOListActionExtender e ECOGlobalActions.
Adicione o componente ReportGenerator e sete sua propriedade OwnerForm para o form atual e mude seu nome para rptRelatorioECO.
* Adicione na propriedade DataSources, clicando no botão Add, o Nome PessoaList e o Value apontando para o ehPessoa. (esse item em tempo de design não deveria ser importante, porém se você não preenche-la você poderá encontrar problemas ao tentar acessar a propriedade DataSource via código, por isso é recomendado preenche-la).
Adicione dois componentes ExpressionHandle e um CurrencyManager.
Mude o nome de um dos ExpressionHandle para ehPessoa e o outro para ehContato e mude o nome do CurrencyManager para cmhPessoa.
O ehPessoa deverá ter a seguinte expressão Pessoa.allInstances->select(e|e.PessoaContato->isEmpty), sete a propriedade *AddDefaultNestings para true e mude a propriedade rootHandle para usar o rhRoot, o ehContato deverá ter está expressão self.Contatos e seu rootHandle deverá apontar para cmhPessoa.
O cmhPessoa deverá ter sua propriedade RootHandle apontando para o ehPessoa e sua propriedade BindingContext apontando para o TWinForm.
*Mudamos para true a propriedade AddDefaulNesting para que nosso relatório entenda que o nosso objeto Contato é uma Pessoa e possui os mesmos campos que uma Pessoa e permita que nós o utilizemos, caso contrario o relatório iria apenas mostrar o objeto sem atributos, não permitindo que o mesmo seja manipulado.
Agora Adicione dois datagrids e três botões.
Mude a opção DataSource de um dos DataGrids para usar o ehPessoa e o outro para usar o ehContato.
Mude a propriedade Text de um dos botões para Criar Pessoa, com o seguinte código no evento Click:
Pessoa.Create(EcoSpace);
Mude a propriedade Text do outro botão para Criar Contato, com o seguinte código no evento Click:
var
vContato: Pessoa;
begin
if Assigned(cmhPessoa.Element) then
begin
vContato := Pessoa.Create(EcoSpace);
(cmhPessoa.Element.AsObject as Pessoa).Contatos.Add(vContato);
end
else
MessageBox.Show('Não Existe nenhuma pessoa para adicionar contatos!');
end;
Adicione os seguintes namespaces na seção uses do seu código: NineRays.Reporting.DOM, System.Resources,
NineRays.Reporting.View.
Mude a propriedade Text do outro botão para Gerar Relatório, com o seguinte código no evento Click:
var
vPreviewForm : PreviewForm;
begin
ehPessoa.EnsureBindingList; //Certificamos que a lista de Pessoas esta atualizada
ehContato.EnsureBindingList; //Certificamos que a lista de Contatos esta atualizada
rptRelatorioECO.DataSources.Clear; //Limpamos a lista de DataSources do Relatorio.
rptRelatorioECO.DataSources.Add('PessoaList',ehPessoa.GetList); //Adicionamos a nossa lista de pessoas atual ao datasource.
rptRelatorioECO.DesignTemplate; //Este método é utilizado apenas para desenharmos o relatorio. Após Desenhado não será mais utilizado.
rptRelatorioECO.LoadTemplate(Application.ExecutablePath.Trim('ExemploRelatoriEco.exe'.ToCharArray)+'\relatorioEco.rst'); //Carregamos o arquivo que iremos salvar após Desenhar o relatório e salvar. Atenção o nome do relatório deve ser o mesmo do que foi salvo no Design dele.
vPreviewForm := PreviewForm.Create(rptRelatorioECO); //Criamos o form de Preview do Relatório.
try
try
rptRelatorioECO.Prepare; //Preparamos o relatorio
vPreviewForm.WindowState := FormWindowState.Maximized; //Setamos o estado da janela para Maximizado.
vPreviewForm.ShowDialog; //Exibimos a tela de Preview.
except
on ee : Exception do MessageBox.Show(ee.Message, 'Relatorio no ECO', MessageBoxButtons.OK, MessageBoxIcon.Error); //Se ocorrer algum erro mostramos o mesmo para o usuário.
end;
finally
vPreviewForm.Dispose; //Liberamos o recurso da memória.
end;
end;
Agora Execute o programa e click no botão Gerar Relatório a tela de design será exibida, como abaixo:
Vá no menu File -> New -> Blank Report e click em Ok.
Com nosso novo relatório criado vamos adicionar um PageHeader (cabeçalho) no nosso relatório, para isso click no ícone
depois click no relatório e posicione o pageheader no topo da pagina. Vá na aba DataSources e vá no Item Special Fields, você encontrará campos para identificar o numero da pagina a descrição do documento, total de paginas e outros, Click e arraste o Page Number para dentro do PageHeader e posicione o na lateral direita. (Atenção: Coloque sempre dentro ou o mesmo não será exibido). Você poderá colocar o titulo de seu Relatório dentro do PageHeader caso queira que ele seja exibido em todas as paginas ou colocar um Detail e escrever dentro para ele aparecer apenas na pagina inicial. No nosso caso vamos adicionar um detail, para isso click no ícone e Posicione o abaixo de seu pageHeader, após fazer adicione um texto dentro do Detail utilizando o primeiro item da barra lateral esquerda, chamado TextBox, e altere sua propriedade Text para Relatório ECO e 9Rays. Vamos agora começar a manipular os dados do ECO.
Para isso adicione um DataBand clicando no ícone
e posicione-o abaixo do Detail, click no DataBand e altere sua propriedade DataSource para PessoaList (O Nome dado no DataSource do rptRelatorioEco), atenção para manipular os dados a serem exibidos todos os componentes como Header, Detail e outros deverão ser colocados dentro do DataBand principal ou os dados não serão exibidos. Bom com nosso DataBand criado vamos agora colocar um Header dentro dele, para isso click no ícone
e desenhe-o dentro do DataBand. (Repeti novamente para que não ocorra nenhum erro). Depois de feito isso adicione dois TextBox um com o Text Nome e o outro Endereço. Depois de feito isso adicione dentro do DataBand um componente Detail, vá na aba Data Sources e expanda o item PessoaList (Mesmo nome do rptRelatorioEco) click e arraste o item Nome para dentro do Detail, faça a mesma coisa com o Endereço.
Bom agora vamos adicionar um outro DataBand dentro do nosso Databand para exibir os Contatos de cada Pessoa, adicione o DataBand e configure seu DataSource para apontar para PessoaList.Contatos.
Após ter feito isso adicione um Header e um Detail dentro deste DataBand como feito no primeiro porem você deverá pegar os campos da aba DataSource que esta dentro do PessoaList -> Contatos e arrastá-los como feito anteriormente.
Após ter feito isso você poderá adicionar um pageFooter para colocar um rodapé.
O resultado final devera ser como o abaixo:

Salve o relatório com o nome relatorioEco no mesmo diretório do executável e feche o editor de relatórios, feche o programa e remova ou comente a linha:
rptRelatorioECO.DesignTemplate;
Salve seu Projeto e execute o programa, adicione algumas Pessoas e alguns Contatos e veja o resultado final ;).
Para baixar o 9Rays entre no site da empresa: 9Rays
Abraços e espero que tenham gostado e até semana que vem.
Qualquer duvida ou comentários postem no blog afinal está liberada a postagem de comentários sem cadastro no blog.
terça-feira, 21 de fevereiro de 2006
Understanding Delphi's codetemplate
For those who don’t know code templates we can say that they are models of codes made to improve the process of development time.
When you are writing your code just press the Ctrl+J to show the code templates list or type the code template name and press Space, the Delphi IDE will write the template code to be edited. Code templates can be made to appear in Delphi’s code completition.
So let’s create our code template.
1º - Go to View -> Templates, it will open a lateral bar with all of Delphi installed templates.
2º - Click at the new button, located at the top of the templates names.
A new document called template1.xml will be created with the follow tags:
<?xml version="1.0" encoding="utf-8" ?>
<codetemplate xmlns=" http://schemas.borland.com/Delphi/2005/codetemplates " version="1.0.0">
<template name="" invoke="manual">
<description>
</description>
<author>
</author>
<code language=""><![CDATA[]]> </code>
</template>
</codetemplate>
The first and the second line it’s just xml markup tags and it doesn’t need to be edited.
The template tag has a property called name, here you have to specify the name of our template (The name that will be displayed in IDE) and the property invoke that is used for:
Invoke = “auto”: The IDE will automatic load the template when it’s been typed.
Invoke = “manual”: The IDE will load the template after you typed and press the Tab Key.
Invoke = “none”: The template will be load just after press Ctrl+J and selecting from the list or pressing Ctrl+Space and selecting from the list.
The descripition tagis used to describe what this template is used for, like showed:
<description> This is a test template </description>
The autor tag is used for identify the templates autor ;) like showed:
<autor> Diego M. Garcia </autor>
Before we go to the code tag we have to know another tag called point that is used to identify the points of the code that should be navigable through the Tab Key.
The point tag should always have its name seted to be used in the code tag, so write your point tag like below:
<point name=”test”></point>
Now we should expecifie the text that will be displayed by the IDE inside the editor, to do that, add a tag named text inside the point tag like bellow:
<point name=”test”>
<text> TextToBeChanged </text>
</point>
It’s possible to add the tag called hint to display a hint when the mouse cursor is over the text.
Ex.:
<point name=”test”>
<text> TextToBeChanged </text>
<hint> This is a test Hint Text </hint>
</point>
Ps.: The code template can have more than one point tag.
We still have one tag to see before go to the code tag, that tag is the script tag that is used to call different types of services through IDE like declare a variable and other ones, to know a little more about it take a look at the code templates that come with Delphi. The script tag have a property called language that must be specified or Delphi wouldn’t know. In our case it would be Delphi, the script tag can have two properties to specify when the script will be triggered, the first is onenter=”true” that calls the script when the code template is loaded and the second is onleave=”true” that is called when the user end edit the code template.
Ex.:
<script language=” Delphi” onenter=”false” onleave=”true”>
</script>
The DeclareVariable command can be used in the script tag and it should reference an point tag that has the variable name definition in its text tag like below:
<point name="InternalVarName">
<text>TypeAnIntegerValue</text>
<hint>Variable to be used. </hint>
</point>
<script language="Delphi" onenter="false" onleave="true">
DeclareVariable(InternalVarName);
</script>
Ps.: The characters “|” (Pipes) are used before and after the name of the point tag, they are delimiters.
Until now I haven’t found a way to especify the type of an variable, because the editor automatic assumes the type passed to it.
The code tag write the code to the IDE editor our code template, it has the property language that works like the one in the script tag and the property delimiter that is used to identify the point tag names, in our case it will be the “|” pipe character, take a look above:
<code language=”Delphi” delimiter=””>
<![CDATA[]]>
</code>
Take a look at the automaticaly generated tag called CDATA, pay attention, the code to be displayed must be inside the characters [] or your code wouldn’t be displayed.
Lets write an code template to convert some value to Integer.
To do that add the code inside the CDATA tag.
InternalVarName := Convert.ToInt32(test);
Here is the full code template code:
<?xml version="1.0" encoding="utf-8" ?>
<codetemplate xmlns=" http://schemas.borland.com/Delphi/2005/codetemplates " version="1.0.0">
<template name="TestTemplate" invoke="manual">
<description> This is a test template </description>
<author>
Diego M. Garcia
</author>
<point name=”test”>
<text> TextToBeChanged </text>
<hint> This is a test Hint Text </hint>
</point>
<point name="InternalVarName">
<text>TypeAnIntegerValue</text>
<hint>Variable to be used. </hint>
</point>
<script language="Delphi" onenter="false" onleave="true">
DeclareVariable(InternalVarName);
</script>
<code language="Delphi" delimiter=””><![CDATA[InternalVarName := Convert.ToInt32(test);]]> </code>
</template>
</codetemplate>
Save and Execute your template through Ctrl + J or in case you have changed the invoke to auto, then just type the name of the template and press Space.
Ps.: Sometimes Delphi gives some errors when editing inside its editor, if it happens you have to close the IDE an open it again.
Take a look at the templates that comes with Delphi to discover other tags and other properties.
I Hope you guys have liked ;)
Regards,
Diego.
sexta-feira, 17 de fevereiro de 2006
Entendendo Code Templates do Delphi
Para quem não conhece os codetemplates são modelos de códigos feitos para facilitar e agilizar o processo de desenvolvimento na hora em que você está escrevendo seu código.
Basta você pressionar Ctrl+J para que os codetemplates sejão exibidos ou digite o nome de seu codetemplate pressione espaço, que o delphi escrevera todo o código do seu template para que ele seja alterado. Os codetemplates podem também ser configurados para aparecerem no codecompletition do delphi.
Bom chega de papo furado vamos criar nosso codetemplate.
1º - Vá no menu View->Templates abrira uma barra lateral com todos os templates instalados no delphi.
2º - Clique no botão New que fica em cima dos nomes dos templates.
Será criado um novo documento chamado template1.xml com as seguintes tags:
<?xml version="1.0" encoding="utf-8" ?>
<codetemplate xmlns=" http://schemas.borland.com/Delphi/2005/codetemplates " version="1.0.0">
<template name="" invoke="manual">
<description>
</description>
<author>
</author>
<code language=""><![CDATA[]]> </code>
</template>
</codetemplate>
As duas primeiras linhas são apenas de identificação do xml e do codetemplate não precisão ser modificadas. A tag template possui uma propriedade chamada name e é nela que você especificará o nome do seu template, (O que aparecera na IDE) e a propriedade invoke que server para:
invoke="auto": a IDE deverá acionar automaticamente seu template quando o mesmo for digitado.
invoke="manual": será acionado quando for digitado o nome do template e pressionar a tecla TAB ou apenas pressionar Ctrl+J ou Ctrl+Espaço e selecionar da lista de templates.
invoke="none": será acionado apenas quando o usuário pressionar Ctrl+J ou Ctrl+Espaço e selecionar da lista de templates.
*Obrigado pela dica do invoke="none" Leonel :).
A tag description server para você colocar uma descrição sobre o seu template, como abaixo:
<description> Template de teste </description>
E a tag autor serve para você colocar o nome do autor do template, ficando assim:
<autor> Diego M. Garcia </autor>
Antes de entrarmos na tag code temos que conhecer uma outra tag chamada point que serve para indicar os pontos que serão navegáveis através da tecla tab do teclado para que o usuário mude o conteúdo rapidamente.
A tag point deve sempre conter a propriedade name para que na seção code você possa referenciar a tag point, para isso escreva sua tag point como abaixo:
<point name="teste"></point>
Agora precisamos especificar o conteúdo que irá aparecer na tag point escrito no editor, para isso adicione a tag text dentro da tag point como abaixo:
<point name="teste"><text> TextoAserSubstituido </text></point>
é possível também colocar uma outra tag chamada hint para exibir um hint quando o cursor do mouse estiver em cima do texto.
Ex.: <point name="teste">
<text> TextoAserSubstituido
</text>
<hint>Esse é um texto de teste.</hint>
Obs.: seu codetemplate pode ter mais de uma tag point.
Ainda temos mais uma tag que deve ser abordada antes da tag code, esta tag é a script que é utilizada para que a IDE realize diversos tipos de serviços como declarar uma variável e outros, para saber um pouco mais olhe os templates que já vem com o delphi. A tag script possui uma propriedade chamada language que deve ser especificado para que o delphi reconheça o comando, no nosso caso o language será Delphi, na tag script você pode especificar também se o script será executado quando o codetemplate for acionado, setando sua propriedade onenter="true" ou quando o usuário terminar de utilizar o codetemplate setando sua propriedade onleave="true", ficando assim:
<script language=" Delphi" onenter="false" onleave="true">
</script>
O comando DeclareVariable que pode ser utilizado na tag script deve sempre referenciar uma tag point que contenha a definição do nome desta variável em sua tag text como abaixo:
<point name="NomeInternoDaVariavel">
<text>DigiteUmValorInteiro</text>
<hint>Variável que será utilizada.</hint>
</point>
<script language=" Delphi" onenter="false" onleave="true">
DeclareVariable(NomeInternoVariavel);
</script>
Obs.: os caracteres “ “ (Pipes) são utilizados antes e depois do nome da tag point, são delimitadores.
Até o momento não achei um jeito de especificar o tipo da variável, pois o editor automaticamente assume o tipo que foi passado a ele.
A tag code por sua vez é a responsável para que finalmente sejam escritos no editor todo nosso template, ela possui a propriedade language que funciona exatamente como a da tag script e a propriedade delimiter que serve para que você especifique o delimitador que será utilizado na separação dos nomes das tags point, no nosso caso o caractere “” (Pipe), ficando como abaixo:
<code language=”Delphi” delimiter=””>
<![CDATA[]]>
</code>
Repare na tag em gerada automaticamente pela IDE que esta em azul chamada CDATA preste atenção o código a ser exibido na IDE devera ser colocado entre os caracteres [] ou seu código não será exibido.
Vamos então escrever um template para converter um determinado valor para integer.
Para isso adcione o código dentro do CDATA
NomeInternoVariavel := Convert.ToInt32(teste);
Nosso template completo ficou assim:
<?xml version="1.0" encoding="utf-8" ?>
<codetemplate xmlns=" http://schemas.borland.com/Delphi/2005/codetemplates " version="1.0.0">
<template name="TestTemp" invoke="manual">
<description>
Template de teste
</description>
<author>
Diego M. Garcia
</author>
<point name="teste">
<text> TextoAserSubstituido </text>
<hint>Esse é um texto de teste.</hint>
</point>
<point name="NomeInternoDaVariavel">
<text>DigiteUmValorInteiro</text>
<hint>Variável que será utilizada.</hint>
</point>
<script language=" Delphi" onenter="false" onleave="true">
DeclareVariable(NomeInternoVariavel);
</script>
<code language="Delphi" delimiter=””><![CDATA[NomeInternoVariavel := Convert.ToInt32(teste);]]> </code>
</template>
</codetemplate>
Salve e veja seu template na IDE através da tecla Ctrl+J ou caso tenha configurado o invoke como auto digite o nome de seu template e tecle espaço.
Obs.: As vezes o delphi da alguns erros se você estiver editando direto nele e é necessário finalizar o delphi e abri-lo novamente para que suas modificações estejam disponíveis.
Examine os templates do delphi para conhecer outras propriedades disponíveis das tags.
Abraços e espero que tenham gostado,
Diego M. Garcia.
quinta-feira, 16 de fevereiro de 2006
Class Attributes with OCL (Derivation OCL)
Its amazing how ECO let us solve some requests with just a few minutes. Today I have to add an field that calculates an sugested value for the products of my client in its entry form, so the solution was simple, I added an derived attribute in my Product class with the follow OCL:
self.BuyOrderItem.BuyOrder->orderBy(InsertedDate)->last.BuyOrderItem->Select(ee.Product = self).Value + (self.BuyOrderItem.BuyOrder->orderBy(InsertedDate)->last.BuyOrderItem->Select(ee.Product = self).Value / 100.safeCast(Decimal) * self.Profit)
Model Description: The model has a class called Product that has an attribute called Profit and has an relationship with class BuyOrderItem that has the product payed value and has an relationship with the class BuyOrder that has an attribute called InsertedDate.
OCL Explanation:
We have accessed trought the Product class (self) the Buy Orders (BuyOrder) and have order it by its Inserted Date (InsertedDate), after that we get its last BuyOrder and select its BuyOrderItem that has our product (->Select(ee.Product = self) and get its payed value.
Ok now we have calc the sugested value so lets sum that value plus that value div by 100 multiplied by the product profit attribute that we have in our product class. To do that just sum the first value that we have get, the OCL should be like that:
self.BuyOrderItem.BuyOrder->orderBy(InsertedDate)->last.BuyOrderItem->Select(ee.Product = self).Value + (self.BuyOrderItem.BuyOrder->orderBy(InsertedDate)->last.BuyOrderItem->Select(ee.Product = self).Value
Now we divide by 100 and multiply by our Profit value, so it will be like that:
self.BuyOrderItem.BuyOrder->orderBy(InsertedDate)->last.BuyOrderItem->Select(ee.Product = self).Value + (self.BuyOrderItem.BuyOrder->orderBy(InsertedDate)->last.BuyOrderItem->Select(ee.Product = self).Value / 100.safeCastDecimal * self.Profit)
Ps.: 100.safeCast was used becuse ECO still has some bugs when working with decimal types, dont forget to get the decimal suport unit at the borland website.
The objective was to do that the product class has an calculated attribute tha get the las value payed of a product plus the profit value that the client has especified for the product.
so the problem was Solved ;)
Atributos de classe com Ocl (DerivationOcl)
É impressionante a facilidade que o ECO nos permite ter para resolver alguns tipos de requisitos do dia a dia. Hoje tinha que criar um campo que calculasse o valor sugerido do produto na tela de cadastro de produtos de um de meus clientes, a solução foi simples, criei um atributo derivado em minha classe produto com a seguinte OCL:
self.ItemPedidoCompras.PedidoCompra->orderBy(DataInclusao)->last.ItemPedidoCompras->Select(ee.Produto = self).Valor + (self.ItemPedidoCompras.PedidoCompra->orderBy(DataInclusao)->last.ItemPedidoCompras->Select(ee.Produto = self).Valor / 100.safeCast(Decimal) * self.Lucro)
Descrição do Modelo: O modelo possui uma classe Produto que contem um atributo chamado lucro e possui um relacionamento com a classe ItemPedidoCompra que contem o valor que foi pago este produto e possui um relacionamento com a classe PedidoCompra que por sua vez contem o atributo data de inclusão. Ufa !!!
Explicação da OCL:
Acessamos atravez da classe Produto (self) os pedidos de compras (PedidoCompra) e ordenamos por Data de Inclusão (DataInclusao) depois pegamos o ultimo PedidoCompra acessamos seus Itens (ItemPedidoCompras) e selecionamos (->Select(ee.Produto = self)) o Item que contem o valor do Produto,
ok até aqui tudo bem vamos agora adcionar lucro que é um valor em porcentagem. Ou seja teremos que pegar este valor que achamos até agora e dividir por 100 e depois multiplicar pelo nosso atributo lucro da classe Produto. Para isso basta entao somar o mesmo valor que já achamos ficando nossa OCL assim:
self.ItemPedidoCompras.PedidoCompra->orderBy(DataInclusao)->last.ItemPedidoCompras->Select(ee.Produto = self).Valor +
(self.ItemPedidoCompras.PedidoCompra->orderBy(DataInclusao)->last.ItemPedidoCompras->Select(ee.Produto = self).Valor
Agora dividimos por 100 e multiplicamos pelo nosso lucro, ficando assim:
self.ItemPedidoCompras.PedidoCompra->orderBy(DataInclusao)->last.ItemPedidoCompras->Select(ee.Produto = self).Valor + (self.ItemPedidoCompras.PedidoCompra->orderBy(DataInclusao)->last.ItemPedidoCompras->Select(ee.Produto = self).Valor / 100.safeCast(Decimal) * self.Lucro)
Obs.: 100.safeCast(Decimal) foi utilizado pelo fato do ECO ainda conter alguns bugs ao trabalhar com valores Decimais, não se esqueça tambem de pegar no site da borland o suporte aos calculos de decimais.
O Objetivo foi fazer com que a classe produto calculasse o ultimo valor (que foi pago) deste produto mais o lucro que o cliente quer ter em cima deste produto.
Resolvido o problema ;)
self.ItemPedidoCompras.PedidoCompra->orderBy(DataInclusao)->last.ItemPedidoCompras->Select(ee.Produto = self).Valor + (self.ItemPedidoCompras.PedidoCompra->orderBy(DataInclusao)->last.ItemPedidoCompras->Select(ee.Produto = self).Valor / 100.safeCast(Decimal) * self.Lucro)
Descrição do Modelo: O modelo possui uma classe Produto que contem um atributo chamado lucro e possui um relacionamento com a classe ItemPedidoCompra que contem o valor que foi pago este produto e possui um relacionamento com a classe PedidoCompra que por sua vez contem o atributo data de inclusão. Ufa !!!
Explicação da OCL:
Acessamos atravez da classe Produto (self) os pedidos de compras (PedidoCompra) e ordenamos por Data de Inclusão (DataInclusao) depois pegamos o ultimo PedidoCompra acessamos seus Itens (ItemPedidoCompras) e selecionamos (->Select(ee.Produto = self)) o Item que contem o valor do Produto,
ok até aqui tudo bem vamos agora adcionar lucro que é um valor em porcentagem. Ou seja teremos que pegar este valor que achamos até agora e dividir por 100 e depois multiplicar pelo nosso atributo lucro da classe Produto. Para isso basta entao somar o mesmo valor que já achamos ficando nossa OCL assim:
self.ItemPedidoCompras.PedidoCompra->orderBy(DataInclusao)->last.ItemPedidoCompras->Select(ee.Produto = self).Valor +
(self.ItemPedidoCompras.PedidoCompra->orderBy(DataInclusao)->last.ItemPedidoCompras->Select(ee.Produto = self).Valor
Agora dividimos por 100 e multiplicamos pelo nosso lucro, ficando assim:
self.ItemPedidoCompras.PedidoCompra->orderBy(DataInclusao)->last.ItemPedidoCompras->Select(ee.Produto = self).Valor + (self.ItemPedidoCompras.PedidoCompra->orderBy(DataInclusao)->last.ItemPedidoCompras->Select(ee.Produto = self).Valor / 100.safeCast(Decimal) * self.Lucro)
Obs.: 100.safeCast(Decimal) foi utilizado pelo fato do ECO ainda conter alguns bugs ao trabalhar com valores Decimais, não se esqueça tambem de pegar no site da borland o suporte aos calculos de decimais.
O Objetivo foi fazer com que a classe produto calculasse o ultimo valor (que foi pago) deste produto mais o lucro que o cliente quer ter em cima deste produto.
Resolvido o problema ;)
quarta-feira, 15 de fevereiro de 2006
Creating AutoIncrement Fields with ECO
To Create auto incremented field with ECO II you have to set its class attribute type to integer and its property PMapper to AutoInc (Write exactle like that or ECO should complain) then change the property SaveAction to DBAssign.
If you are using ECO III just set the type of your class attribute to AutoInc and set its SaveAction to DBAssign.
The SaveAction seted to DBAssign makes ECO reread the attribute after persisted to the DataBase.
The SaveActions are:
None: its a normal attribute.
Freeze: It cannot be modified after saved inside DB.
DBAssign: Reread the attribute after persisted to the Database.
Criando campos AutoIncremento no ECO
Para criar campos auto incrementaveis no eco II você devera setar o tipo do atributo da classe para integer e sua propriedade PMapper para AutoInc (Escreva exatamente desse geito ou o ECO ira reclamar) e mude a propriedade SaveAction para DBAssign.
Se você estiver utilizando ECO III tera apenas que setar o tipo do atributo da classe para AutoInc e a propriedade SaveAction para DBAssign.
A propriedade SaveAction setada para DBAssign faz com que o ECO após persistir o objeto no banco de dados execute uma consulta para pegar aquele valor de volta !
As propriedades do SaveAction são:
None: indica que é um atributo normal.
Freeze: Não pode ser modificada após ser salva a primeira vez no banco.
DBAssign: Faz o ECO ler o campo novamente após salvar no banco para pegar seu novo valor.
É isso ai ;)
Welcome
Welcome to the software development Blog.
I will pass some of my knowledges by this Blog.
Keep eye on ;)
I will pass some of my knowledges by this Blog.
Keep eye on ;)
Bem Vindo
Bem vindo ao Blog sobre desenvolvimento de Softwares.
Irei passar alguns de meus conhecimentos atravez deste Blog.
Fique atento ;)
Irei passar alguns de meus conhecimentos atravez deste Blog.
Fique atento ;)
Assinar:
Postagens (Atom)